🎮 Game Dev (게임개발)/PC (데스크탑, 노트북, 터치패널)
[3D 액션게임] 05.아이템 획득과 공전효과
- -
🔔 유튜브 크리에이터 골든메탈님의 유니티강의 3D 쿼터뷰 액션게임 [BE5] 를 보고 공부하여 작성한 게시글입니다! 🔔
코드 전체보기
더보기
using System.Collections;
using System.Collections.Generic;
using UnityEngine;

public class Player : MonoBehaviour
{
    public float speed;
    public GameObject[] weapons;
    public bool[] hasWeapons;
    public GameObject[] grenades;
    public int hasGrenades;


    public int ammo;
    public int health;
    public int coin;

    public int maxAmmo;
    public int maxHealth;
    public int maxCoin;
    public int maxHasGrenades;


    float hAxis;
    float vAxis;


    bool rDown;
    bool jDown;
    bool iDown;
    bool sDown1;
    bool sDown2;
    bool sDown3;

    bool isJump;
    bool isDodge;
    bool isSwap;

    Vector3 moveVec;
    Vector3 dodgeVec;
    Rigidbody rigid;

    Animator anim;

    GameObject nearObject;
    GameObject equipWeapon;
    int equipWeaponIndex = -1;

    // Start is called before the first frame update
    void Start()
    {

    }

    void Awake()
    {
        rigid = GetComponent<Rigidbody>();
        anim = GetComponentInChildren<Animator>();
    }

    // Update is called once per frame
    void Update()
    {
        GetInput();
        Move();
        Turn();
        Jump();
        Dodge();
        Interation();
        Swap();
    }


    void GetInput()
    {
        // 키보드입력에 따라 0 ~ 1로 변환 left right up down
        hAxis = Input.GetAxisRaw("Horizontal");
        vAxis = Input.GetAxisRaw("Vertical");
        rDown = Input.GetButton("Run");
        jDown = Input.GetButtonDown("Jump");
        iDown = Input.GetButtonDown("Interation");
        sDown1 = Input.GetButtonDown("Swap1");
        sDown2 = Input.GetButtonDown("Swap2");
        sDown3 = Input.GetButtonDown("Swap3");
    }

    void Move()
    {
        // x y z
        moveVec = new Vector3(hAxis, 0, vAxis).normalized;

        // 회피 시 업데이트 안되게
        if (isDodge)
            moveVec = dodgeVec;

        // 스왑 시 못움직이게
        if (isSwap)
            moveVec = Vector3.zero;

        // transform
        transform.position += moveVec * (rDown ? 1.3f : 1f) * speed * Time.deltaTime;

        // animator
        anim.SetBool("isWalk", moveVec != Vector3.zero);
        anim.SetBool("isRun", rDown);
    }

    void Turn()
    {
        // Rotation
        transform.LookAt(transform.position + moveVec);
    }

    void Jump()
    {
        if(jDown && moveVec == Vector3.zero && !isJump && !isDodge) {
            // 물리엔진에 힘을 준다. 여기선 즉발적인 Impulse
            rigid.AddForce(Vector3.up * 15, ForceMode.Impulse);
            anim.SetBool("isJump", true);
            anim.SetTrigger("doJump");

            isJump = true;
        }
    }

    void Dodge()
    {
        // 이동하면서 점프할때,
        if (jDown && moveVec != Vector3.zero && !isJump && !isDodge)
        {
            dodgeVec = moveVec;
            speed *= 2;
            anim.SetTrigger("doDodge");
            isDodge = true;

            Invoke("DodgeOut", 0.5f); // 시간지연 라이브러리 기능
        }
    }

    void DodgeOut()
    {
        speed *= 0.5f;
        isDodge = false;
    }

    void Swap()
    {
        if (sDown1 && (!hasWeapons[0] || equipWeaponIndex == 0))
            return;
        if (sDown2 && (!hasWeapons[1] || equipWeaponIndex == 1))
            return;
        if (sDown3 && (!hasWeapons[2] || equipWeaponIndex == 2))
            return;

        int weaponIndex = -1;
        if (sDown1) weaponIndex = 0;
        if (sDown2) weaponIndex = 1;
        if (sDown3) weaponIndex = 2;

        // 1, 2 ,3 버튼 누를때
        if((sDown1 || sDown2 || sDown3) && !isJump && !isDodge) {
            if(equipWeapon != null)
                equipWeapon.SetActive(false);

            equipWeaponIndex = weaponIndex;
            equipWeapon = weapons[weaponIndex];
            equipWeapon.SetActive(true);

            anim.SetTrigger("doSwap");


            // 스왑 중
            isSwap = true;
            Invoke("SwapOut", 0.4f);

        }
    }
    void SwapOut()
    {
        isSwap = false;
    }

    void Interation()
    {
        if(iDown && nearObject != null && !isJump && !isDodge) {
            if(nearObject.tag == "Weapon") {
                Item item = nearObject.GetComponent<Item>();
                int weaponIndex = item.value;
                hasWeapons[weaponIndex] = true;

                Destroy(nearObject);
            }
        }
    }

    // 충돌 시 이벤트 함수로 착지 구현
    void OnCollisionEnter(Collision collision)
    {
        if(collision.gameObject.tag == "Floor"){
            isJump = false;
            anim.SetBool("isJump", false);
        }
    }

    // 아이템 획득
    private void OnTriggerEnter(Collider other)
    {
        if(other.tag == "Item") {
            Item item = other.GetComponent<Item>();
            switch (item.type){
                case Item.Type.Ammo:
                    ammo += item.value;
                    if (ammo > maxAmmo)
                        ammo = maxAmmo;
                    break;
                case Item.Type.Coin:
                    coin += item.value;
                    if (coin > maxCoin)
                        coin = maxCoin;
                    break;
                case Item.Type.Heart:
                    health += item.value;
                    if (health > maxHealth)
                        health = maxHealth;
                    break;
                case Item.Type.Grenade:
                    if (hasGrenades == maxHasGrenades)
                        return;
                    grenades[hasGrenades].SetActive(true);
                    hasGrenades += item.value;
                    break;
            }
            Destroy(other.gameObject);
        }
    }

    private void OnTriggerStay(Collider other)
    {
        if (other.tag == "Weapon")
            nearObject = other.gameObject;
    }
    private void OnTriggerExit(Collider other)
    {
        if (other.tag == "Weapon")
            nearObject = null;
    }
}
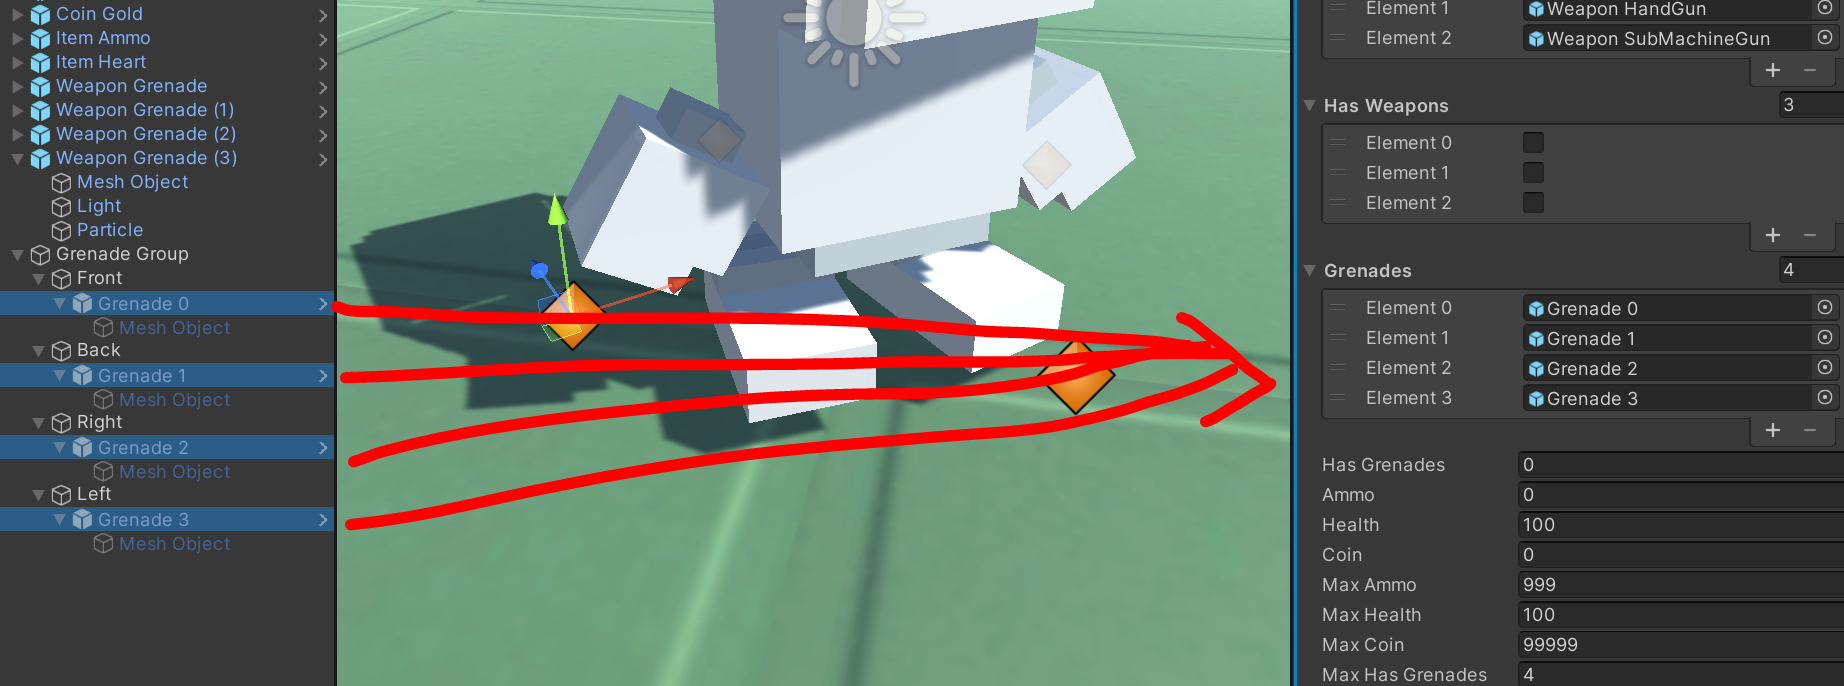
🧷 1. 아이템 변수 생성
- 아이템 최대횟수 및 가지고 있는 개수
/* Player script, 추가된 코드만 간단히 작성하였습니다. */

public class Player : MonoBehaviour
{
	public GameObject[] grenades;
    public int hasGrenades;


    public int ammo;
    public int health;
    public int coin;

    public int maxAmmo;
    public int maxHealth;
    public int maxCoin;
    public int maxHasGrenades;
}
- 스크립트 작성 후 유니티로 돌아가 default 값을 설정해주면 됩니다. (public으로 두었기에 가능)
- 아이템 획득 기능 추가
/* Player script, 추가된 코드만 간단히 작성하였습니다. */

public class Player : MonoBehaviour
{
    private void OnTriggerEnter(Collider other)
    {
        if(other.tag == "Item") {
            Item item = other.GetComponent<Item>();
            switch (item.type){
                case Item.Type.Ammo:
                    ammo += item.value;
                    if (ammo > maxAmmo)
                        ammo = maxAmmo;
                    break;
                case Item.Type.Coin:
                    coin += item.value;
                    if (coin > maxCoin)
                        coin = maxCoin;
                    break;
                case Item.Type.Heart:
                    health += item.value;
                    if (health > maxHealth)
                        health = maxHealth;
                    break;
                case Item.Type.Grenade:
                    if (hasGrenades == maxHasGrenades)
                        return;
                    hasGrenades += item.value;
                    break;
            }
            Destroy(other.gameObject);
        }
    }
}- OntriggerEnter 함수를 만들어, 접촉시에 플레이어의 아이템 소지 갯수를 늘리고 파괴시켜줍니다.
- 이때 swtich case문을 사용하였습니다. (조건에 type을 바로 넣어 쉽게 사용할 수 있더군요)
🧷 2. 수류탄 공전물체 만들기
- 공전물체 자리 선정하기
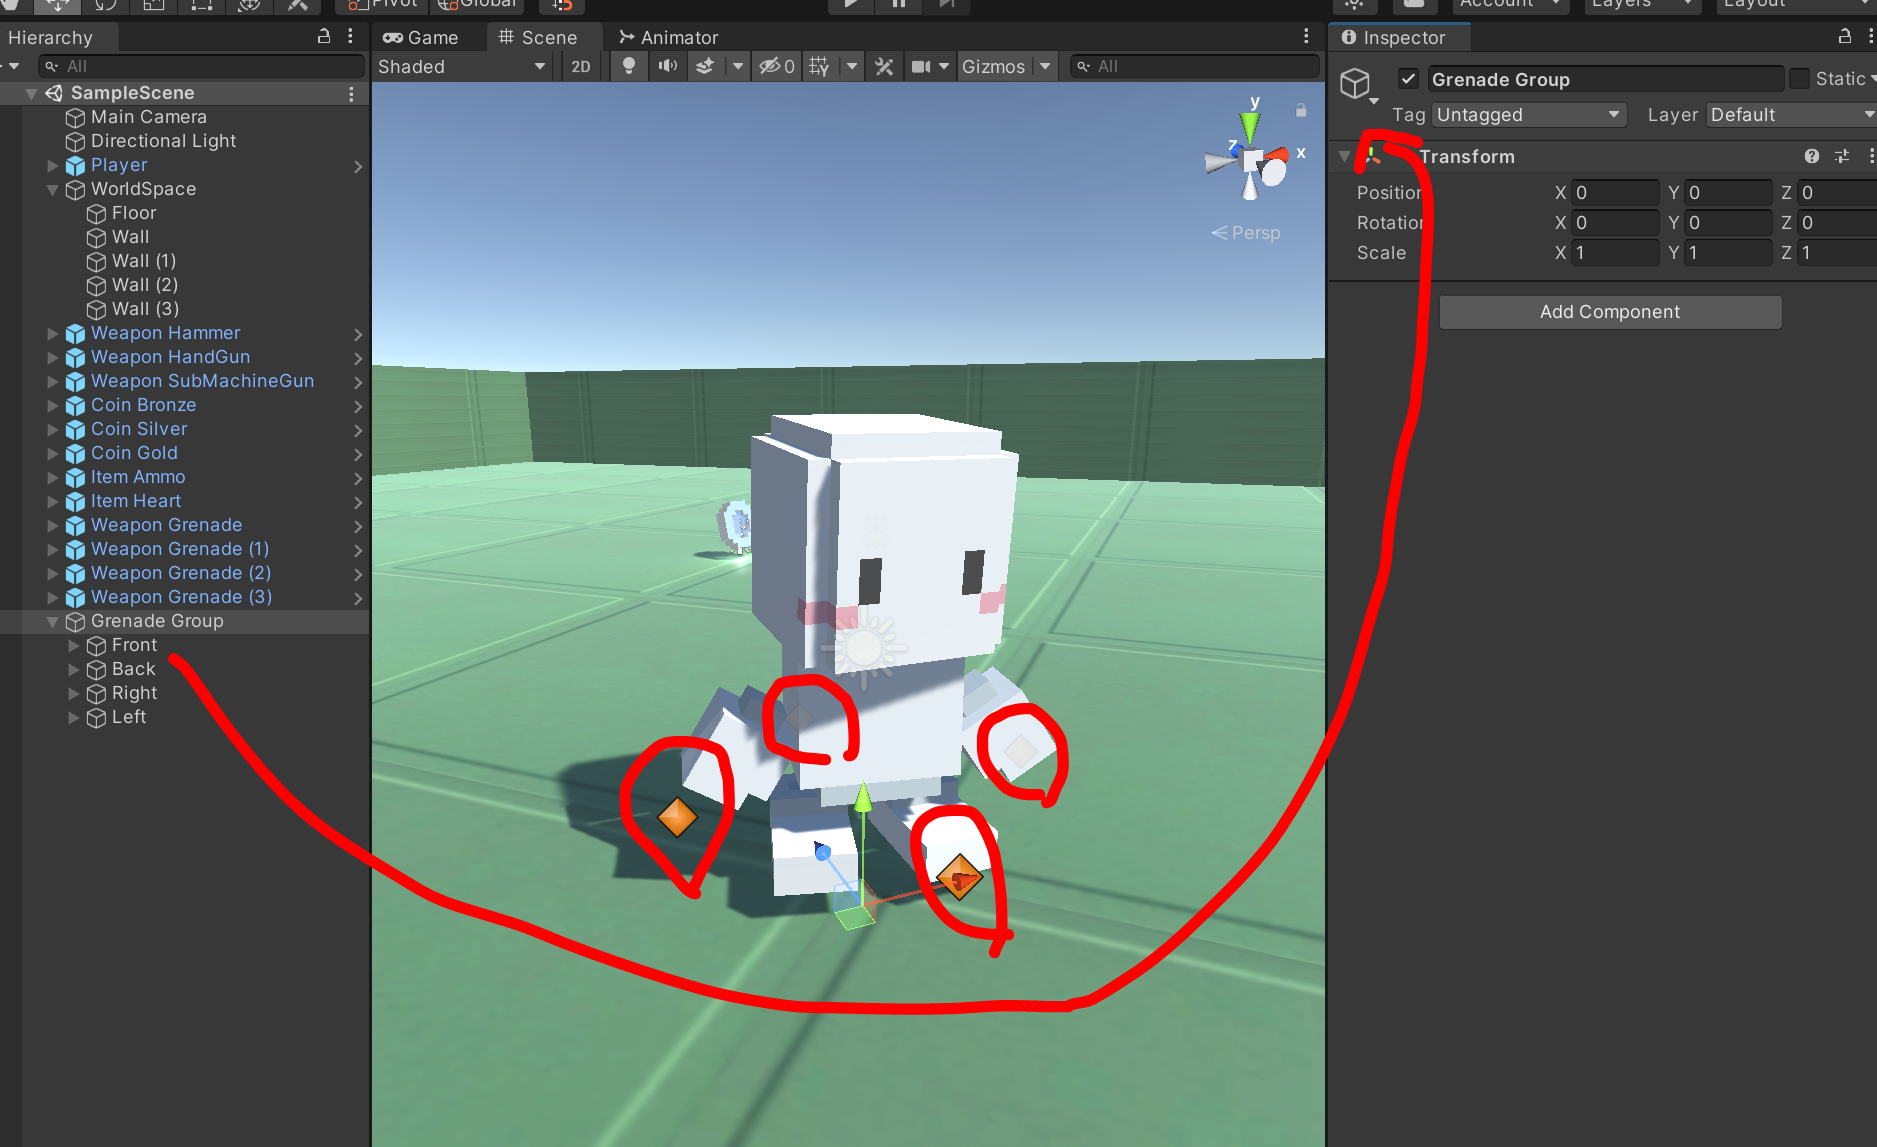
- Create Empty를 하여 그 속에 4개의 빈 객체를 만들어, 자리를 선정해주었습니다.
- 자리가 어떻게 잡혔는지 보이기 위해, 저기 화살표로 된 박스를 클릭하여 주황색 점으로 바꿔 자리를 선정해줍니다.
- 공전물체 하위에 수류탄 에셋 넣어주기
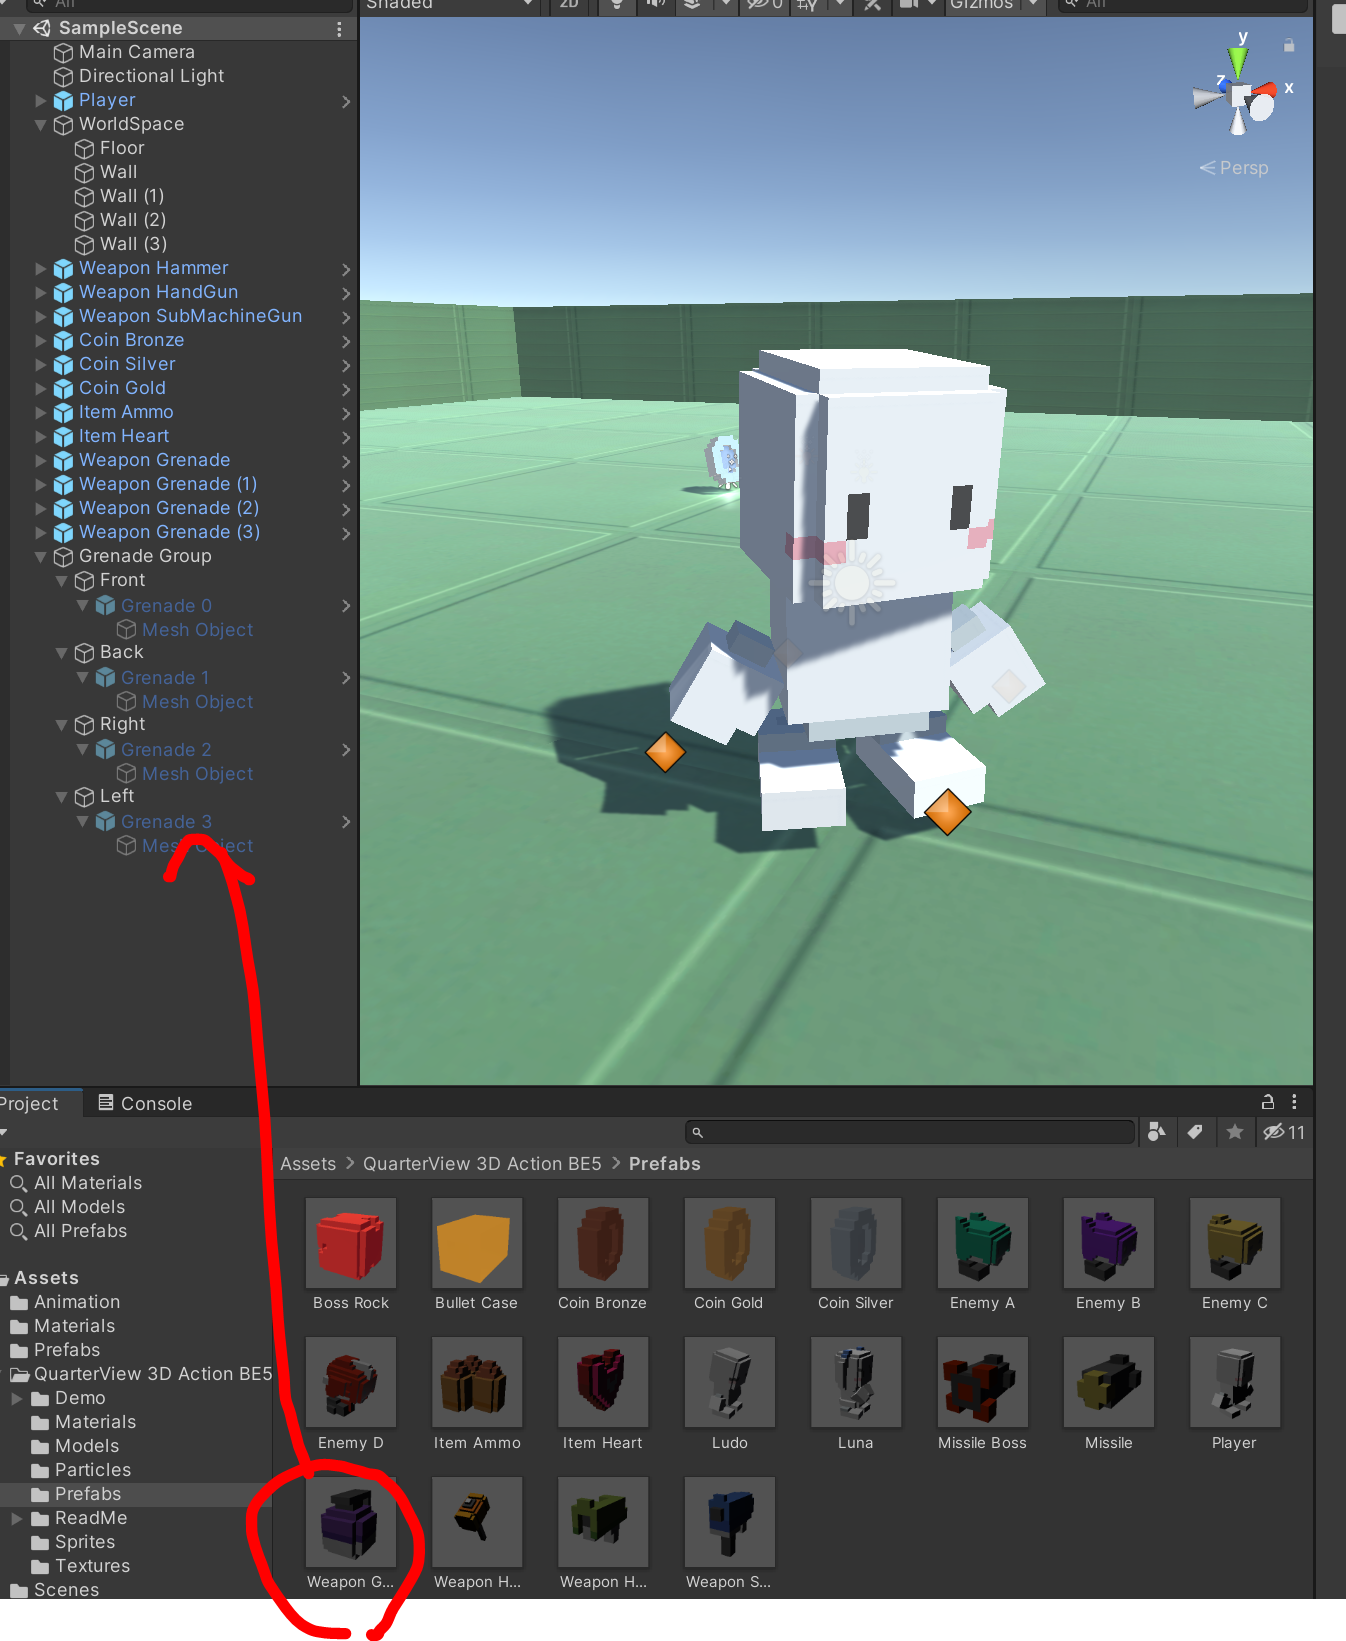
- 공전하는 수류탄 재질 바꿔주기
- 수류탄을 꾸미기 위해 재질도 바꿔주고 Light, Particle도 넣어주었습니다.
- 움직이는 것에 따른 파티클 연출하기
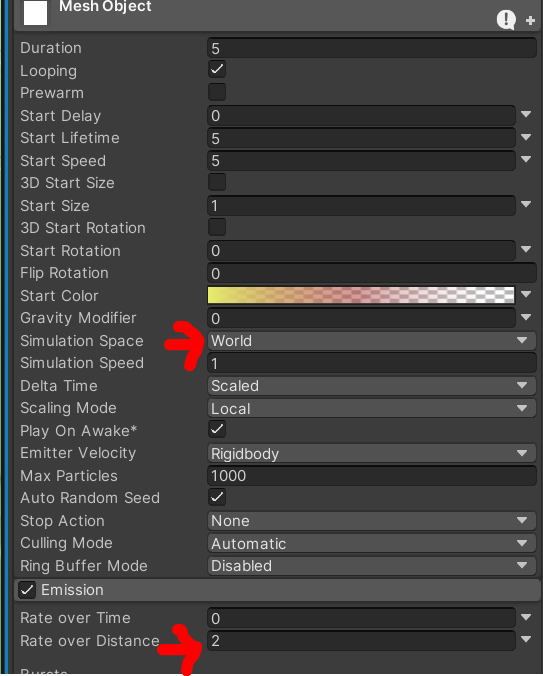
- 파티클 구현에서 Simulation Space 를 local에서 World로 바꿔줍니다
- Emission도 Time에서 Distance로 두어야지 움직일 때 파티클연출이 됩니다.
🧷 3. 공전 구현
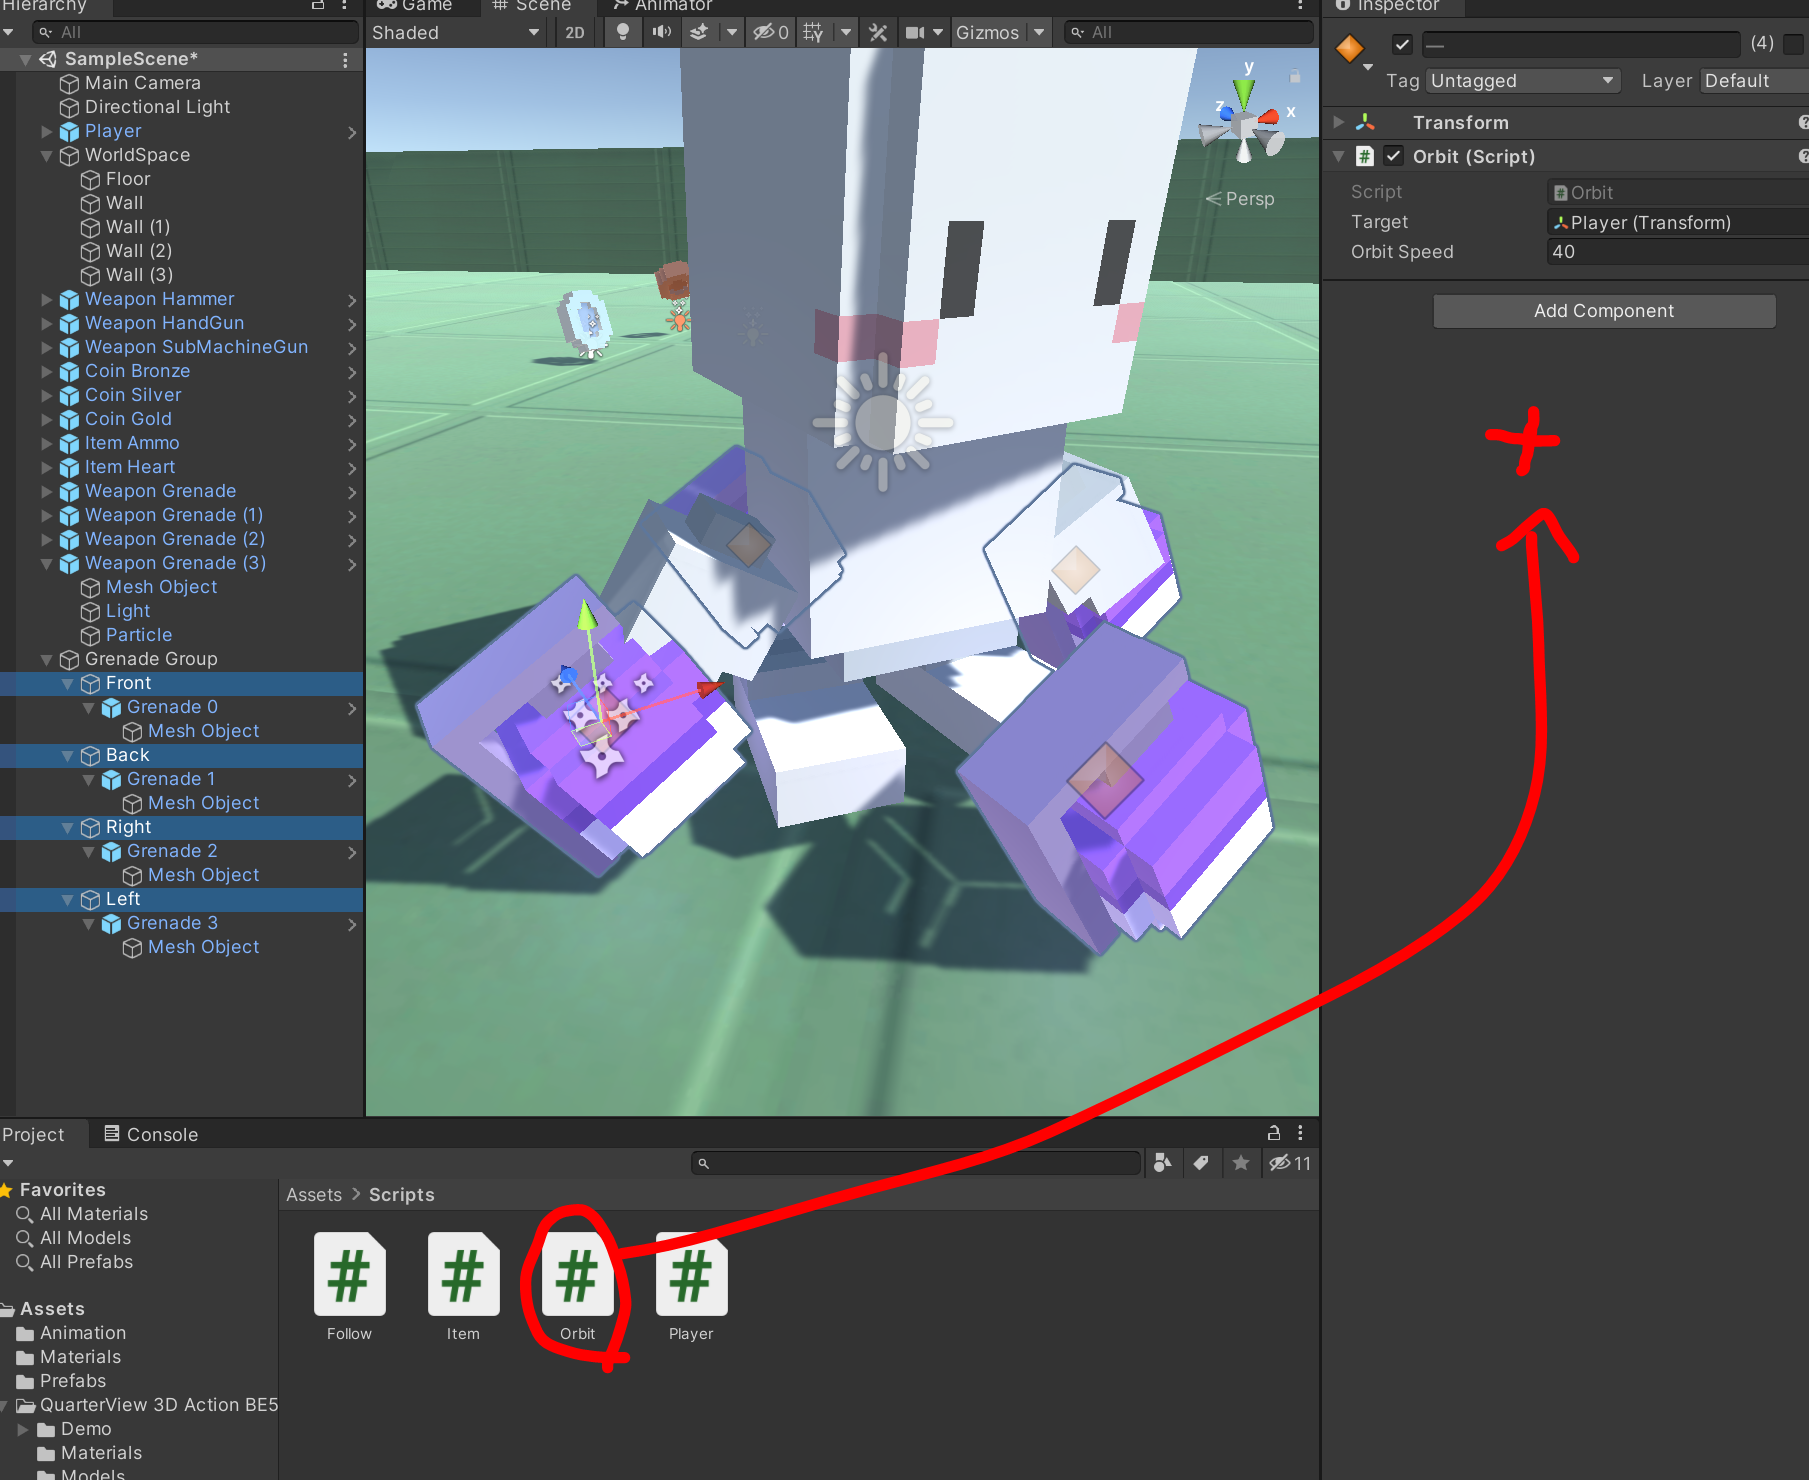
- Orbit 스크립트를 각 부위별로 넣어줍니다.
/* Orbit script */

public class Orbit : MonoBehaviour
{

    public Transform target;
    public float orbitSpeed;
    Vector3 offSet; // target에서 얼마나 떨어진지의 거리입니다.


    void Start()
    {
        offSet = transform.position - target.position;
    }

    // Update is called once per frame
    void Update()
    {
        transform.position = target.position + offSet;
        transform.RotateAround(target.position,
                                Vector3.up,
                                orbitSpeed * Time.deltaTime);
        offSet = transform.position - target.position;
    }
}- transform.RotateAround(회전할 타겟 포지션, 회전방향, 힘) 을 주어 공전하게 해줍니다.
- 또한 offset를 갱신해주어 플레이어를 따라다닐 수 있게 해줍니다.
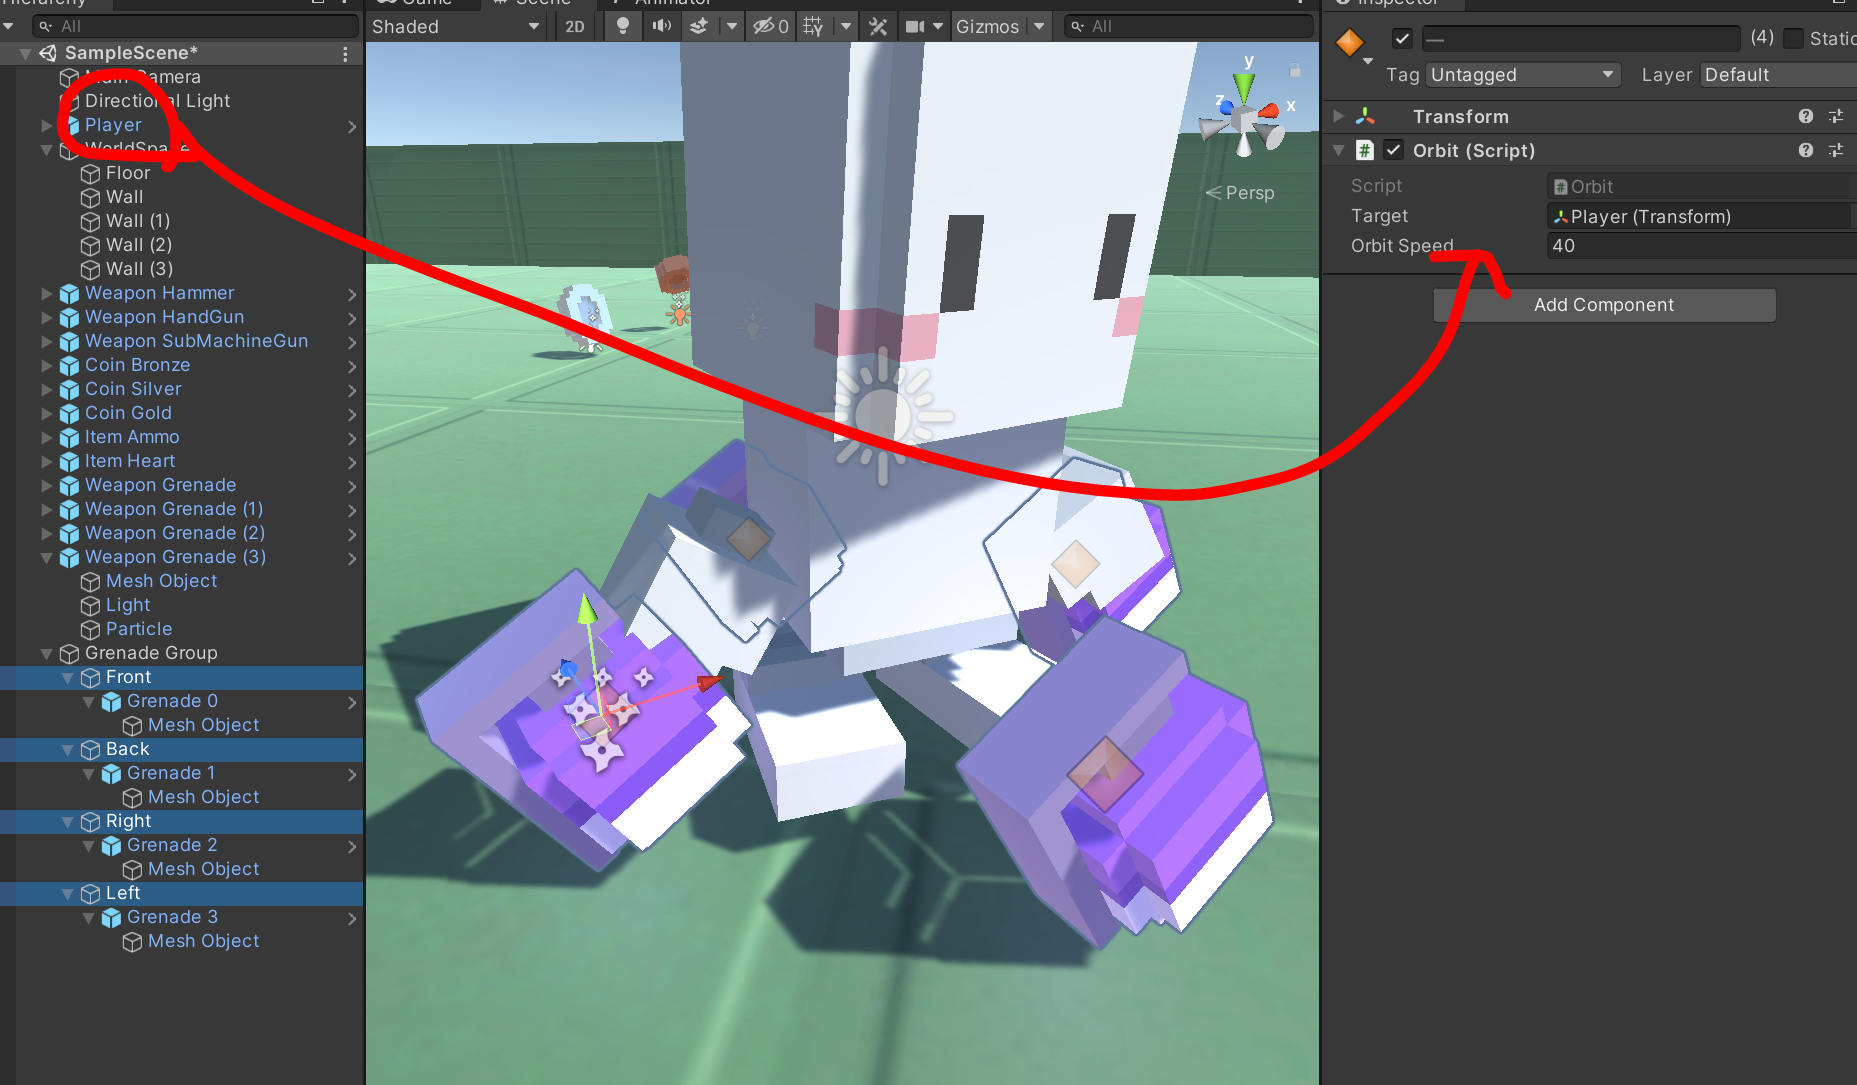
- Target 에 플레이어를 넣어주면 끝입니다.~
🧷 4. 수류탄 먹은 뒤 활성화 구현
- 수류탄 기본값 비활성화
- 수류탄의 기본값을 비활성화 시켜줍니다.
- 수류탄 활성화 기능 추가
/* Player script, 추가된 코드만 간단히 작성하였습니다. */

public class Player : MonoBehaviour
{
	public GameObject[] grenades;
    public int hasGrenades;

    private void OnTriggerEnter(Collider other)
    {
        if(other.tag == "Item") {
            Item item = other.GetComponent<Item>();
            switch (item.type){
                case Item.Type.Ammo:
                    ammo += item.value;
                    if (ammo > maxAmmo)
                        ammo = maxAmmo;
                    break;
                case Item.Type.Coin:
                    coin += item.value;
                    if (coin > maxCoin)
                        coin = maxCoin;
                    break;
                case Item.Type.Heart:
                    health += item.value;
                    if (health > maxHealth)
                        health = maxHealth;
                    break;
                case Item.Type.Grenade:
                    if (hasGrenades == maxHasGrenades)
                        return;

                    grenades[hasGrenades].SetActive(true); // 이거 추가

                    hasGrenades += item.value;
                    break;
            }
            Destroy(other.gameObject);
        }
    }

}
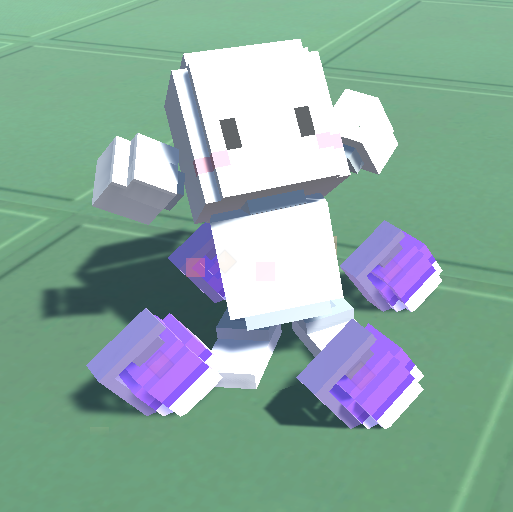
grenades[hasGrenades].SetActive(true); 추가하여, 먹을 시 활성화되어 우리 눈에 보이도록 해줍니다.
- 플레이어의 수류탄 오브젝트 넣어주기
- 오브젝트를 플레이어에게 연결시켜주는 것을 끝으로 이번 강좌는 끝이였습니다.~~
출처: 골든메탈님 유튜브
https://www.youtube.com/watch?v=esGkgvm9eSg&list=PLO-mt5Iu5TeYkrBzWKuTCl6IUm_bA6BKy&index=5
'🎮 Game Dev (게임개발) > PC (데스크탑, 노트북, 터치패널)' 카테고리의 다른 글
| [3D 액션게임] 07. 원거리무기 공격구현 (0) | 2022.04.02 |
|---|---|
| [3D 액션게임] 06. 근접무기 공격구현 (0) | 2022.04.01 |
| [3D 액션게임] 04.무기 획득과 변경 (0) | 2022.03.30 |
| [3D 액션게임] 03.아이템 만들기 (0) | 2022.03.29 |
| [3D 액션게임] 02.점프와 회피 (0) | 2022.03.28 |
Contents
소중한 공감 감사합니다