🎮 Game Dev (게임개발)/PC (데스크탑, 노트북, 터치패널)
[2D 멀티게임] 03. 플레이어 기능
- -
🔔 유튜브 크리에이터 고라니TV님의 유니티강의 2D 횡스크롤 멀티게임 만들기 를 보고 공부하여 작성한 게시글입니다! 🔔
이번에는 포톤(Photon)을 이용하여 게임내의 기능 만들어 포톤과 연결시키는 과정을 할 것 입니다.
🧷 1. 플레이어 컴포넌트
- 컴포넌트
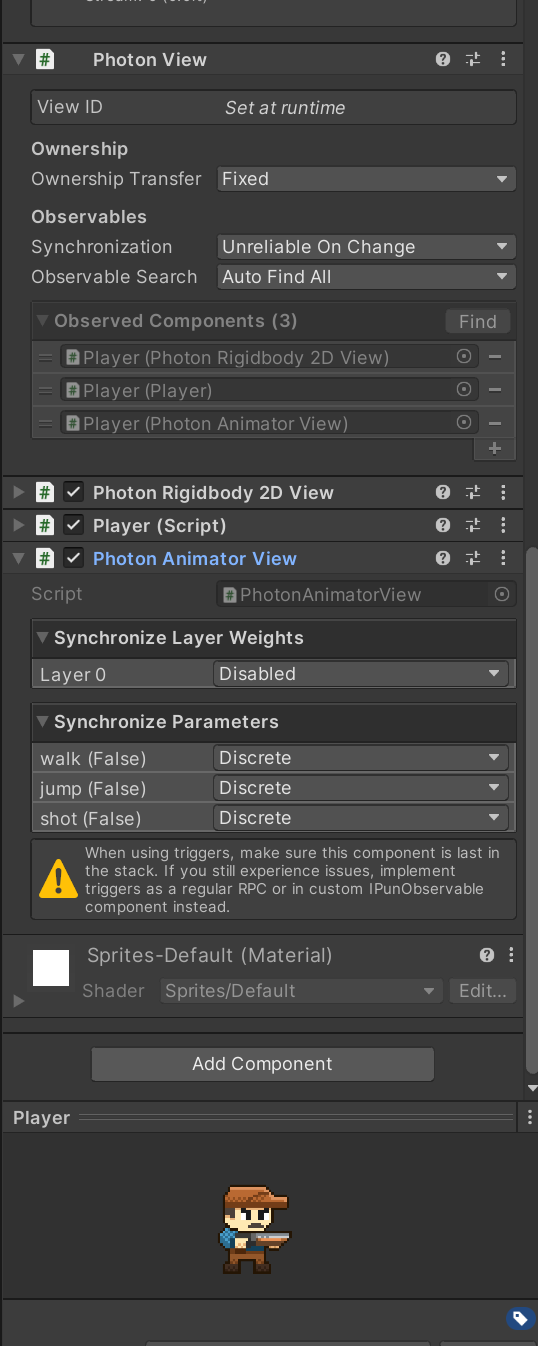
Photon View 가 맨위에 되어 있고, Observed Components에 필요한 포톤컴포넌트들이 자리 잡아야합니다.
차례로 Rigidbody 2d view, Player script, Photon ANimator View로 담겨져 있고,
Photon Animator View는 특이하게 맨 아래에 있어야지 잘 동기화가 됨을 알 수 있습니다.
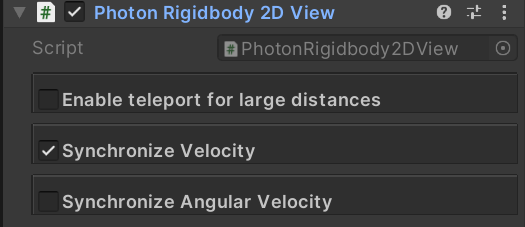
이동은 Velocity로 하기에 동기화를 체크해줍니다.
🧷 2. 플레이어 스크립트
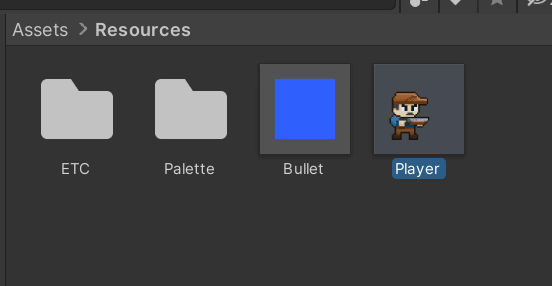
- 프리팹
포톤을 이용하여 사용하는 리소스들은 무조건 Resources 폴더 안에 넣어야지 잘 작동합니다.
- 기능들
using System.Collections;
using System.Collections.Generic;
using UnityEngine;
using Photon.Pun;
using Photon.Realtime;
using UnityEngine.UI;
using Cinemachine;
public class Player : MonoBehaviourPunCallbacks, IPunObservable
{
    public Rigidbody2D RB;
    public Animator AN;
    public SpriteRenderer SR;
    public PhotonView PV;
    public Text NicknameText;
    public Image HealthImage;

    public int speed;
    float axis;
    bool jDown;
    bool sDown;
    bool isGround;
    Vector3 curPos;

    void Awake()
    {
        NicknameText.text = PV.IsMine ? PhotonNetwork.NickName : PV.Owner.NickName;
        NicknameText.color = PV.IsMine ? Color.green : Color.red;

        if (PV.IsMine)
        {
            // 2D 카메라
            var CM = GameObject.Find("CMcamera").GetComponent<CinemachineVirtualCamera>();
            CM.Follow = transform;
            CM.LookAt = transform;
        }
    }

    void Update()
    {
        if (PV.IsMine)
        {
            GetInput();
            Move();
            Jump();
            Shot();
        }

        // 다른 플레이어들을 부드럽게 위치 동기화 시켜줍니다.
        else if ((transform.position - curPos).sqrMagnitude >= 100) transform.position = curPos;
        else transform.position = Vector3.Lerp(transform.position, curPos, Time.deltaTime * 10);
    }

    void GetInput()
    {
        axis = Input.GetAxisRaw("Horizontal");
        jDown = Input.GetButtonDown("Vertical");
        sDown = Input.GetButtonDown("Shot");
    }

    void Move()
    {
        RB.velocity = new Vector2( speed * axis, RB.velocity.y);

        if (axis != 0)
        {
            PV.RPC("FlipXRPC", RpcTarget.AllBuffered, axis); // 재접속시 flipX를 동기화 해주기 위해 AllBuffered
        }
        AN.SetBool("walk", axis != 0);

    }

    [PunRPC]
    void FlipXRPC(float axis) => SR.flipX = axis == -1;

    void Jump()
    {
        if(jDown && isGround)
        {
            isGround = false;
            AN.SetBool("jump", true);
            PV.RPC("JumpRPC", RpcTarget.All);
        }
    }

    [PunRPC]
    void JumpRPC()
    {
        RB.velocity = Vector2.zero;
        RB.AddForce(Vector2.up * 600);
    }

    void Shot()
    {
        if (sDown)
        {
            PhotonNetwork.Instantiate("Bullet", transform.position + new Vector3(SR.flipX ? -0.4f : 0.4f, -0.11f, 0), Quaternion.identity)
                .GetComponent<PhotonView>().RPC("DirRPC", RpcTarget.All, SR.flipX ? -1:1);
            AN.SetTrigger("shot");
        }
    }

     public void OnDamage()
    {
        HealthImage.fillAmount -= 0.1f;
        if(HealthImage.fillAmount <= 0)
        {
            GameObject.Find("Canvas").transform.Find("RespawnPanel").gameObject.SetActive(true);
            PV.RPC("DestroyRPC", RpcTarget.AllBuffered); // AllBuffered를 해야 복제 버그가 안생깁니다.
        }
    }

    [PunRPC]
    void DestroyRPC() => Destroy(gameObject);

    void OnCollisionEnter2D(Collision2D collision)
    {
        if (collision.gameObject.tag == "Ground")
        {
            isGround = true;
            AN.SetBool("jump", false);
        }
    }

    // 변수 동기화
    public void OnPhotonSerializeView(PhotonStream stream, PhotonMessageInfo info)
    {
        if (stream.IsWriting)
        {
            stream.SendNext(transform.position);
            stream.SendNext(HealthImage.fillAmount);
        }
        else
        {
            curPos = (Vector3)stream.ReceiveNext();
            HealthImage.fillAmount = (float)stream.ReceiveNext();
        }
    }
}
사용한 위의 PhotonView.RPC는 원격으로 함수를 부른다는 의미를 가지고 있습니다.
photonview를 가지고 있는 컴포넌트인 player에게 함수를 실행하도록 합니다.
또한 RPC 함수에는 [PunRPC] 로 구분지어줍니다.
photonView.RPC(함수이름, RPC타겟들, 넘겨줄 파라미터) 이런식으로 사용합니다.
예를 들면 아래의 코드가 있습니다.
 void Move()
    {
        RB.velocity = new Vector2( speed * axis, RB.velocity.y);

        if (axis != 0)
        {
            PV.RPC("FlipXRPC", RpcTarget.AllBuffered, axis); // 재접속시 flipX를 동기화 해주기 위해 AllBuffered
        }
        AN.SetBool("walk", axis != 0);

    }

    [PunRPC]
    void FlipXRPC(float a) => SR.flipX = a == -1;
RPC 함수로 이용 할 FilpXRPC 함수에는 파라미터로 값이 한개 들어가야합니다.
이때, RPC를 호출하고, RpcTarget에는 AllBuffered에 넘겨주면서 axis 값을 파라미터로 넘겨줍니다.
그래서 SR.flipX에 axis값을 비교해가며 값을 저장하게 됩니다.
더 자세한 기능의 이해는 포톤 사이트를 보며 참고하였습니다.
7 - 플레이어 네트워킹 | Photon Engine
Cookie 설정 Photon은 귀하를 로그인 사용자로 식별하고 품질을 개선하고 마케팅을 위해 쿠키를 사용합니다. 아래 Cookie 설정을 확인하고 프라이버시를 관리해 주시기 바랍니다. 당사가 Cookie를 사용
doc.photonengine.com
출처: 고라니TV님 유튜브
https://www.youtube.com/watch?v=9Bn1C9O0hzY
'🎮 Game Dev (게임개발) > PC (데스크탑, 노트북, 터치패널)' 카테고리의 다른 글
| 🏆 [우수상][메타버스 소개팅] 너만봄 (0) | 2022.10.23 |
|---|---|
| [2D 멀티게임] 02. 네트워크 입장 관리 (0) | 2022.05.29 |
| [2D 멀티게임] 01. 환경 설정 (0) | 2022.05.28 |
| [3D 액션게임] 22. 시연 영상 (0) | 2022.05.19 |
| [3D 액션게임] 21. 하늘 바꾸기 (0) | 2022.05.19 |
Contents
소중한 공감 감사합니다